How to Detect Unknown Devices on Your WiFi Network
Your internet slows to a crawl. Video calls start buffering. Downloads that should take seconds drag on for minutes. You glance at the router - all the lights are blinking like mad. And then the thought hits you: is someone else on my WiFi?
It's not paranoia. The average household now has over 20 connected devices, and that number grows every time you plug in a new smart bulb, set up a security camera, or let a guest connect their phone. The problem is that most people have no idea what half of those devices actually are. A mysterious "ESP_29A4F1" or "Unknown - 192.168.1.47" sitting on your network could be a smart plug you forgot about - or it could be a neighbor freeloading on your connection.
Here's how to find out exactly who and what is on your network, and what to do about it.
Why Unknown Devices Appear on Your Network
Before you assume the worst, understand that most "unknown" devices have perfectly innocent explanations. Here are the most common reasons unfamiliar devices show up on your WiFi:
- Forgotten devices - An old phone, tablet, or laptop that's still connected. Kids' devices you set up months ago. A work laptop you don't use anymore.
- Smart home gadgets - Smart plugs, light bulbs, thermostats, and robot vacuums often report themselves with cryptic manufacturer names rather than friendly labels like "Living Room Lamp."
- Family and guest devices - Your partner's new phone, a friend who connected last weekend, your kids' gaming console. Once a device has your WiFi password, it reconnects automatically.
- IoT devices with strange hostnames - Many cheap IoT devices use their chipset manufacturer as their hostname. "Espressif" is a smart plug. "Tuya" is a smart bulb. "Realtek" could be anything with a network chip.
- A neighbor piggybacking - If your WiFi password is weak, short, or was shared too freely, someone nearby could be using your network without your knowledge.
The challenge is telling the difference between a forgotten smart plug and an actual intruder. That requires scanning your network and identifying each device.
Method 1: Check Your Router's Admin Panel
Every router keeps a list of connected devices. To see it:
- Open a browser and go to 192.168.0.1 or 192.168.1.1 (the most common router addresses - check the sticker on the bottom of your router if neither works)
- Log in with your admin credentials (the default is usually printed on the router too)
- Find the section labeled "Connected Devices," "DHCP Client List," "Attached Devices," or similar
- Review the list of everything connected to your network
You'll typically see an IP address, a MAC address, and sometimes a hostname for each device. The problem? Most routers give you almost nothing to work with. You'll see entries like "14:91:82:3C:AA:F0" with no indication of what device that actually is. You can look up the MAC address vendor prefix online, but even that only tells you the chipset manufacturer - not whether it's your security camera or someone's laptop.
Limitation: Router admin panels are clunky, vary wildly between manufacturers, and provide minimal identification data. They'll tell you something is connected but rarely help you figure out what it is. For most people, there's a much faster way.
Method 2: Scan with PingKit (Free)
The scan gives each device it identifies a type such as Router/Gateway, Printer or Smart Speaker, working from the hostname, the open ports and the Bonjour and SSDP details each one advertises, and the LAN scanner tool page shows what a finished scan looks like before you install anything.
PingKit's LAN Discovery is purpose-built for exactly this problem. Open the app, tap Scan, and within seconds you'll see every device on your network with significantly more detail than your router provides:
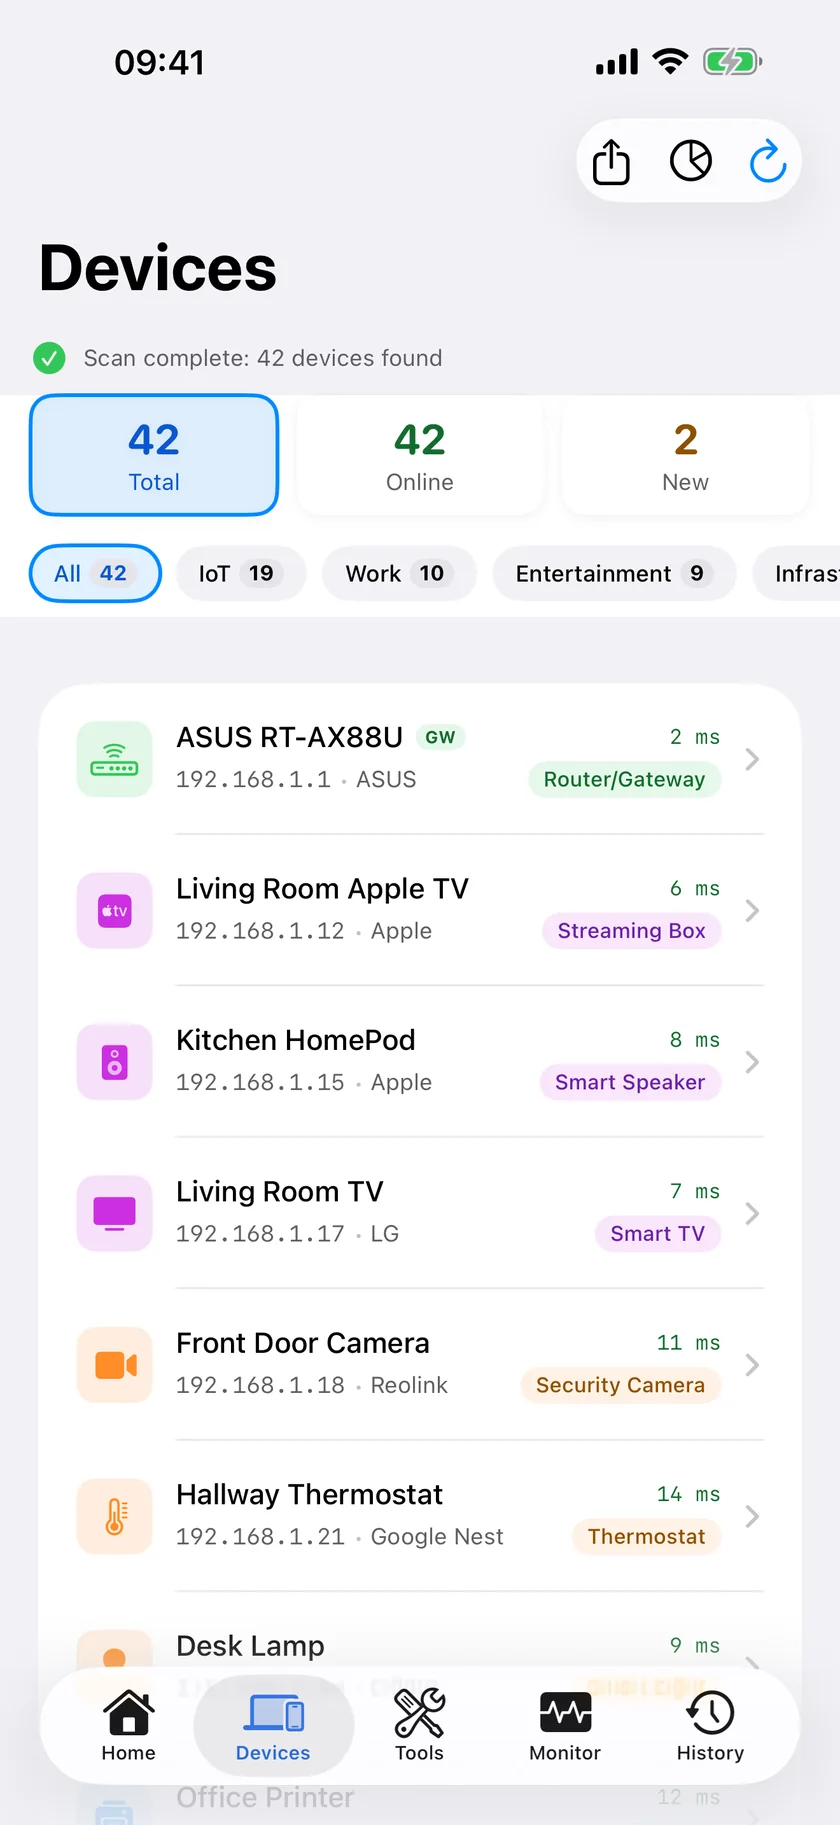
- IP address and hostname
- MAC address with vendor identification (so "14:91:82" becomes "Samsung Electronics")
- Signature-based device classification - PingKit doesn't just show you a manufacturer. It combines vendor data, open ports, and advertised services to classify devices into categories like "Smart TV," "iPhone," "Security Camera," "Game Console," or "Smart Speaker" - and Guardian's AI steps in for the ones that leaves ambiguous. Instead of puzzling over a MAC address, you see what the device actually is.
- Deep fingerprinting - PingKit combines hostname patterns, MAC vendor data, open ports, and mDNS/Bonjour service discovery to build a complete picture of each device
This is the difference between staring at a list of MAC addresses and actually understanding your network. When PingKit tells you that "Espressif" device is a "Smart Plug" and that "Amazon" device is a "Streaming Stick," you can quickly account for every device and spot anything that doesn't belong.
How to Identify Mystery Devices
Even with good scanning tools, you might find a device or two that you can't immediately place. Here's a systematic approach to tracking them down:
Check the MAC Vendor
The first three bytes of a MAC address identify the manufacturer. PingKit resolves this automatically, but the vendor name is your biggest clue. If you see "Apple" it's an iPhone, iPad, Mac, or Apple TV. "Samsung" could be a phone, TV, or appliance. "Amazon" is likely an Echo or Fire Stick.
Look at the Hostname
Some devices broadcast a helpful hostname. "Pauls-iPhone" is obvious. "ROKU-4E2F" tells you it's a Roku device. But many devices use default hostnames like "ESP-29A4F1" or just their IP address, which is where PingKit's classification layer becomes critical.
Use the Elimination Method
If you have a stubborn mystery device, try this: disconnect or power off your devices one by one and re-scan after each. When the mystery device disappears from the scan, you've found your match. Start with IoT devices and smart home gadgets - they're the usual suspects.
Quick trick: Count the devices you expect to see on your network before scanning. Phone, laptop, TV, router - that's 4. If PingKit finds 12, you have 8 devices to account for. Smart home gadgets add up fast.
Naming What the Scan Cannot Name
A scan identifies a device from what it publishes about itself: the services it advertises over Bonjour, the description it serves over SSDP, its hostname, the ports it answers on. Most things on a home network publish enough to be named. Some publish almost nothing, and those are the rows that stay stubbornly unlabelled no matter how many times you scan. A games console is the classic example, and a cheap smart plug is the other.
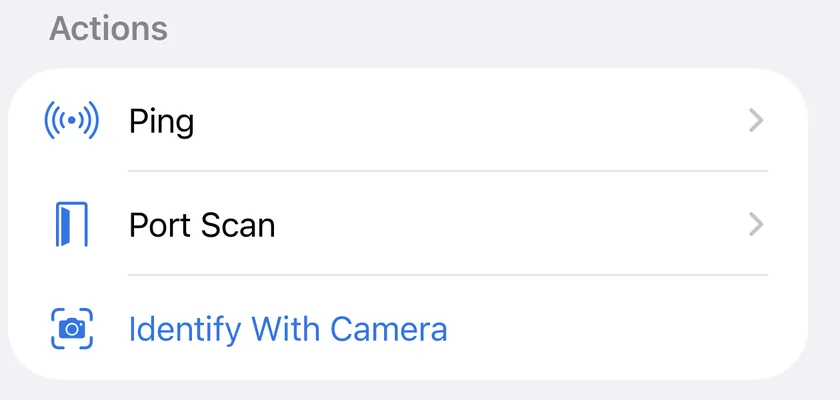
PingKit 3.0 adds two ways past that, and one of them is a camera.
Name it yourself, once
Open the device's row and use Name This Device. The name is stored against that device and used in every scan afterwards, so the work of identifying something is done once rather than every time you look. This is the step most people skip and then repeat the same investigation three months later.
Identify With Camera
On an iPhone running iOS 27 where Apple Intelligence is available, the device detail screen offers Identify With Camera. Photograph the label on the back or underside of the box and the on-device model reads it: the make, the model and one printed identifier such as a serial or a model number. It writes what it reads into the name field, so use it on a device you have not named yet.
Three things are worth knowing about it before you use it:
- The photograph is read on the iPhone and never leaves it. There is no cloud fallback and no way to add one; the feature simply does not appear on a device that cannot run the model locally, rather than quietly sending the image somewhere else.
- It refuses to read Wi-Fi keys and network names. Router labels carry both, and returning them would turn a naming tool into something else.
- The button is hidden where it cannot run, which includes every iPhone below iOS 27, every device without the on-device vision model, and every language Apple Intelligence does not cover. That is deliberate: an offer that fails is worse than no offer.
Or ask
You can also ask the assistant "what is this device". It reads what the app already knows about your network and, where a measurement would answer the question, offers to run one: a scan of your own network, or a ping of one device on it. Nothing runs until you tap to allow it, and the assistant cannot be handed a target, because the actions it can offer are a fixed list rather than something the model composes.
On a scan you have already run, Explain This Result turns the device list into a sentence about what is on the network and what stands out. It is a button, not something that fires on its own.
Common "Unknown" Devices That Are Actually Yours
Before raising the alarm, check this list. These devices consistently confuse people because they show up with manufacturer names instead of product names:
- "Espressif" or "Espressif Inc." - Almost certainly a smart plug, smart bulb, or other budget IoT device. The ESP32/ESP8266 chip is in thousands of smart home products.
- "Tuya Smart" or "Tuya Inc." - Another smart home platform. Powers devices from dozens of brands including many sold under store-brand labels.
- "Amazon Technologies" - Echo smart speakers, Fire TV Sticks, Fire tablets, Ring doorbells, Blink cameras.
- "Roku" - Streaming sticks and smart TVs with built-in Roku.
- "Sonos" - Speakers that stay connected 24/7.
- "Roborock" or "Xiaomi" - Robot vacuums, air purifiers, or other Xiaomi ecosystem devices.
- "Texas Instruments" - Often a smart thermostat or Zigbee hub.
- "Murata Manufacturing" - The WiFi chip in many Sony PlayStation consoles.
- "Kindle" or device showing no hostname - E-readers that periodically wake up to sync.
PingKit's ML classifier is trained to recognize these patterns and label them correctly, saving you the detective work. But knowing the common culprits helps if you ever need to verify manually.
What to Do If You Find a Real Intruder
You've gone through the list. You've accounted for every smart plug, every family phone, every streaming device. And there's still a device you can't explain. Time to take action - quickly.
1. Change Your WiFi Password Immediately
This is the nuclear option, but it works. Changing your WiFi password kicks every device off the network instantly. The intruder loses access. Yes, you'll need to reconnect all your own devices, but that's a small price for security. Choose a strong password - at least 16 characters, mixing letters, numbers, and symbols.
2. Upgrade Your Encryption
While you're in the router settings, check your encryption protocol. You should be using WPA3 if your router and devices support it, or WPA2 (AES) at minimum. If you see WPA, WEP, or "TKIP" anywhere, those are broken protocols that can be cracked within minutes. Switch immediately.
3. Disable WPS
WiFi Protected Setup (WPS) is that button on your router that lets you connect devices without typing a password. The PIN-based version of WPS has a well-known vulnerability that allows brute-force attacks. Disable WPS entirely in your router settings. The minor convenience isn't worth the security risk.
4. Consider MAC Address Filtering
MAC filtering lets you create a whitelist of allowed devices. Only devices whose MAC addresses you've approved can connect. It sounds great in theory, but there are limitations: MAC addresses can be spoofed by a determined attacker, and you'll need to manually add every new device. It's a useful extra layer, but don't rely on it as your only defense.
5. Create a Separate Network for IoT Devices
Most modern routers support guest networks. Set one up and move all your smart home devices to it. This way, even if an IoT device with poor security is compromised, the attacker is isolated from your main network where your phones, laptops, and personal data live.
After locking down: Run another PingKit scan 30 minutes after changing your password. Only your own devices - the ones you manually reconnected - should appear. If the mystery device comes back, you have a more serious problem that may require contacting your ISP or resetting your router to factory defaults.
Set Up 24/7 Monitoring with PingKit Guardian
Manual scanning catches what's on your network right now. But what about the device that connects at 2 AM while you're asleep? Or the one that hops on for 10 minutes while you're at work?
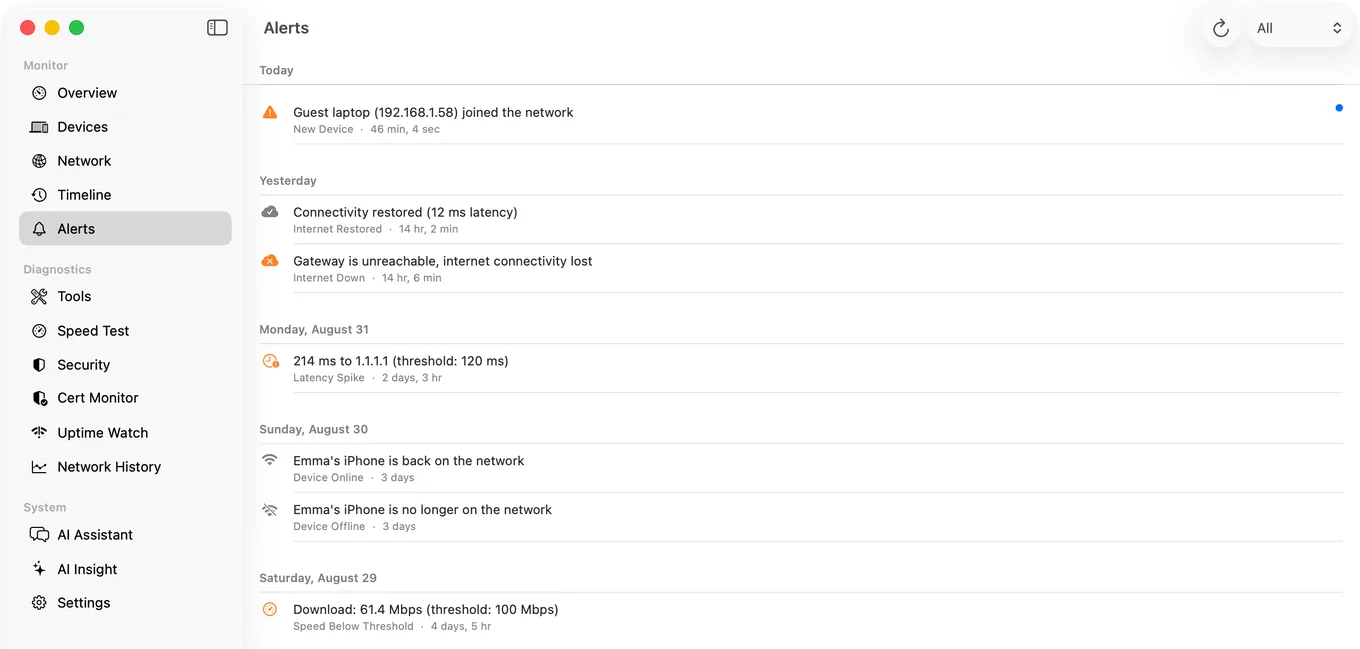
PingKit Guardian is a Mac Agent that runs continuously in the background, watching your network around the clock. When any new device joins your WiFi - whether it's 3 PM or 3 AM - the Agent detects it on its next scan and Guardian carries the alert to your iPhone. No more manual scanning, no more wondering what connected while you weren't looking.
This is the difference between checking the list once a day and having something keep it for you. Guardian keeps a complete log of every device that has ever connected, when it appeared, and when it left. If something suspicious shows up, you will know within a scan interval, not days.
Go Beyond Detection: Security Scoring
Knowing what's on your network is step one. Step two is understanding which of those devices are actually putting you at risk.
PingKit's security scoring evaluates each device against dozens of rules covering open ports, risky software banners, protocol weaknesses, and configuration issues. Every device on your network gets a security posture rating, so you can see at a glance which ones need attention.
That old smart camera running on an unpatched firmware with port 23 (Telnet) wide open? PingKit flags it. The printer that's been broadcasting on an open port for years? Flagged. Your router still accepting connections on its default management port? You'll see it.
The goal isn't just to find unknown devices - it's to understand your network's overall security posture and fix the weakest links before they matter.
Take Action Now
Every day you don't check is another day an unauthorized device could be sitting on your network, consuming your bandwidth, or worse - intercepting your traffic. The good news is that checking takes less than 30 seconds.
Open PingKit. Tap Scan. See everything. It's that straightforward.
Related Articles
- Network Security Checkup for iPhone
- Is Someone Stealing My WiFi?
- How to Find All Devices on Your WiFi
- How to Secure Your Home WiFi
- PingKit for Smart Homes: Find & Secure IoT Devices
- Noxen - Nightly security audits for Linux servers (sister app) →
- Fingbox Alternatives Without the Hardware
- Get an Alert When a New Device Joins Your WiFi
- LAN Scanner for iPhone
- Printer Keeps Going Offline on WiFi: How to Find the Cause
- WiFi Camera or Doorbell Keeps Going Offline: How to Diagnose It
- AirPrint Printer Not Found on iPhone: Is It on the Network?
Find Out Who's on Your WiFi
PingKit scans your entire network in seconds. Signature-based classification names most devices from what they publish, which is what the iPhone has to work with: iOS never gives an app another device's MAC address. Free to download.
Download PingKit Free